
Flexible Tank Repair Kit
Convenient Field Repair Kit for Pillow Tanks
 Water Storage Tanks' flexible tank repair kit is a quick and easy way to patch small leaks on your flexible tank or containment berm. Tank repair kits are designed to fix small leaks by providing an easy process for adhering a patch onto your tank.
Specify your tank's material, and we will include an exact fabric match. Whether your tank is for potable water, graywater, fuel, or hydrocarbons, our flexible tank repair kit is a custom solution for each situation.
Each patch repair kit will contain a vinyl patch (chosen based on your tank's material), vinyl cement, scissors, seam roller, and sandpaper, all packaged inside a resealable bag. All items necessary for your bladder tank repair are included in the patch repair kit.
Considering financing? Click here to apply for financing options for this product!
Give us a call at +1-863-261-8388 or fill out our quote request form to discuss your project.
Flexible Tank Vinyl Repair Kit Included Items
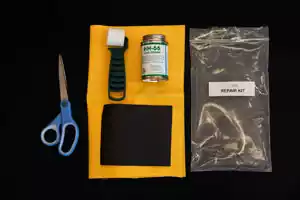 The repair kit is an all-inclusive package containing every tool necessary to patch and repair your flexible tank. Each vinyl repair kit includes the following items:
- 1 sq. ft. Vinyl Patch
- Scissors
- 4 oz. Vinyl Adhesive
- Sand Paper
- Seam Roller
- Instructions
All of these items are contained in a resealable plastic bag for ease of use and storage.
How to Use the Bladder Tank Repair Kit
The patch repair kit is designed specifically for use with flexible tank products, including containment berms and flexible liquid storage tanks. They are compatible with the following products:
- Potable Water Tanks
- Grey Water Flexible Tanks
- Onion Tanks
- Frame Tanks
- Fuel Storage Tanks
- Tank Containment Berms
- Secondary Containment Liners
Additional accessories that are commonly used for these products include a Ground Cloth or custom fittings.
Installing the Flexible Tank Repair Kit Patch
Instructions for repairing your bladder tank leak are included with each patch kit.
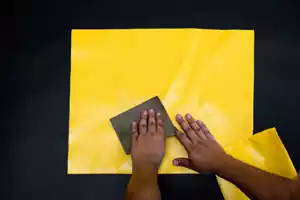 Prepare the Tank for Patching: Drain the tank and ensure the patch area is dry. Use the included sandpaper to sand the leaking area and patch to prepare for the adhesive. Once the entire patch area is roughed, clean with soap and water or a vinyl-friendly solvent.
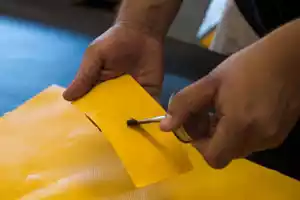 Apply the Adhesive: Once the bladder tank is abraded and clean, it is ready for the application of the vinyl cement. Two coats should be applied for proper adhering of the patch.
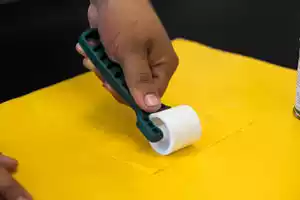 Patch the Tank: The vinyl repair kit patch can be cut to size or used as-is. Fabric must extend at least 2" around all sides of the leak to ensure a proper fit. Once the patch is applied, use the included seam roller to flatten the patch and remove and air bubbles and ensure all sides are even.
Questions about bladder tank repair? We can help! Call the Water Storage Tanks team at +1-863-261-8388 or contact us to discuss your project.